DIY Skull Decor
January 01, 2019
Transform a plain white skull into a piece of art. Steven shares what can be done with everyday craft materials, glue and a little imagination!
Email us your results with us or tag us with #SandCCollection on social media to be featured in the S&C newsletter and on social media!
Go Disco - this glossy hot pink painted skull and POM POM afro have all the right moves.
How To :
Sophisticated Skull - paper isn’t just for wrapping, Steven decoupaged this skull with Japanese rice paper.
How To:
- Cut 2” square pieces of thin wrapping paper
- Decoupage the entire skull (using Mod Podge glue), carefully layer paper squares until entire skull is covered
- Let dry on a protected surface at least 24 hours.
Embrace NEON! The perfectly placed torn pieces of tape make this skull AWESOME
How To :
- Tear small strips of neon tape in various colours
- Use your imagination and apply tape wherever your creative juices take you
- Great craft to do with your kids!
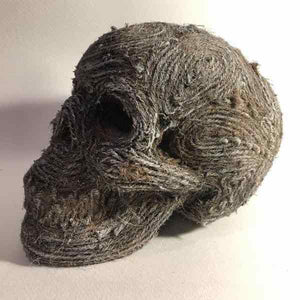
Textured twine and patience is the focus of this design.
How To:
- Hot glue textured twine in no particular pattern and create this great skull (Steven’s favourite)
- Carefully add glue to the skull in swirling patterns then add the twine (by hand or with a nail file)
- Steven finished it off by “dry brushing” white acrylic paint all over the skull then shade black paint to emphasize the shadowed areas such as the eyes and nostrils.
- Be careful … glue guns are hot, use a rubber thimble on your fingers for protection, an oil dipped nail file also works.


